How to Connect Brother Printer to Laptop: 3 Best Ways
Brother printers are adorable, and people are adopting them for their regular printing routine. What’s stopping you? Wait, are you dealing with connection issues with your brother printer? If yes, this blog might give you a boost and help you connect your devices. In this guide, I’ll teach you how to connect Brother printer to laptop in some easy ways.

If you want
to use a brother printer, let me tell you that it’s currently a highly
demanding printer. With a plethora of features and qualities, it never runs out
of users. For some users, Brother printers are their first choice. You can
access a wired as well as wireless connection with your brother printer.
Let’s dive
into this full guide that explains everything about the connection well and
helps users.
Method 1: Via a USB Cable
This is the
first method on my list. As a USB cable connection is easy to access, every
user who wants a quick connection can consider this connection type. Look at
the steps below to learn how to connect
Brother printer to laptop using USB.
- To
start, turn on the power button
and turn off the printer.
- Then,
unbox the cable and connect its one end to the USB port of your printer.

- Now,
connect the second end of the USB cable to your laptop’s USB port.
- After
that, confirm that both ends are securely inserted.
- Finally,
turn on your printer and laptop and continue with your printing process.
This is how to connect Brother printer to laptop
using a USB cable. This method will work for you in getting the desirable
prints from your printer. Check out the other methods to learn the connection
process in a better way.
Method 2: Via a Wi-Fi Network
You can also
connect your printer to a wireless connection using a Wi-Fi connection method.
Look at the steps below to learn how to
connect Brother printer to laptop wirelessly.
- To
start, turn on your printer and head to the Settings option on the Home screen.
- While
on the Settings page, select
the Wi-Fi icon and then hit the
Setup Wizard option.

- After
that, select the SSID keyword of your wireless network and tap on the OK button.
- Now,
type your network’s security key and hit the OK button.

- Next,
stand for a few minutes when the wireless connection is set up.
- At
last, your devices will connect to each other via a wireless network.
This is how to connect Brother printer to laptop
using a Wi-Fi connection.
Method 3: Using the Brother Printer Drivers
You can also
choose to connect your brother printer to a laptop using printer drivers. This
method works really well for your printer connection to a laptop. Before you
get started with the process, note down your router or SSID network name and
password. Then, continue with the given steps to connect your devices.
- To
get started, hit the Start menu
and click on the Settings
option.
- Then,
select the Devices option to
continue on your computer.

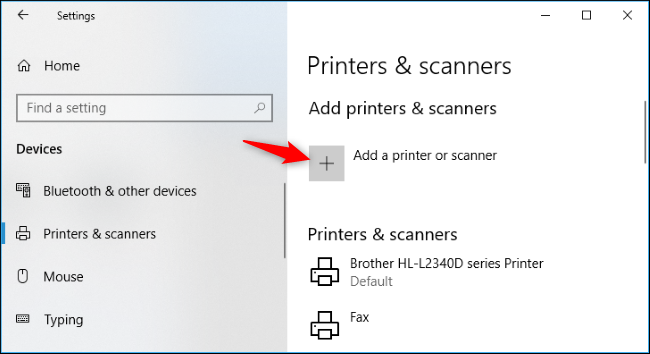
- Move
on to the Printers & Scanners option
on the left side of the panel.
- After
that, tap on the Add a printer or
scanner option on the right side of the screen.

- If
you don’t see your printer, select the option that describes your answer.
- Now,
take a USB cable and connect your printer to your laptop.
- Next,
click on the Add a local printer or
network printer with manual settings option.

- In
the following step, hit the Next button.
- Then,
take a test file to check if your printer is working.
- At
last, hit the Finish button at
the bottom of your screen.
During this
process, you’ll understand if your printer is connected to your laptop or not.
This is how to connect Brother printer
to laptop.
FAQs
How Do I Connect Brother Printer to Computer via Bluetooth?
Follow the
given steps below to connect your brother printing device via Bluetooth:
- Initially,
double-check your printer’s local name.
- Then,
launch the windows Settings and
turn on the Bluetooth option.
- Now,
hit the Add Device option and
select your Bluetooth device name.
- When
you see the Bluetooth icon on your screen, your Bluetooth settings will be
complete.
How Can I Connect Brother Printer to My Mac?
To connect
Brother printer to Mac computers, use these steps:
- In
the first step, navigate to Brother’s official website.
- Then,
visit the brother printer software package.
- Now,
download the necessary printer drivers on your Mac.
- After
that, search for the Wireless
Device Setup Wizard under the Utilities
window.
- Next,
complete the setup process between your printer and wireless router.
- Select
the SSID network of your printer and continue with the on-screen
directions.
How to Connect Brother Printer with an Ethernet Cable?
To connect
your brother printing device via an Ethernet cable, use these steps.
- Start
the process by buying an Ethernet cable or LAN cable of the required size.
- Then,
connect its one end to your printer’s port.
- Now,
connect its other end to your Wi-Fi router.
- Finally,
turn on your devices and access your connection.


Comments
Post a Comment